Video Creator’s Channel Derrick Aquino
I Used To Be More Of An Audiophile
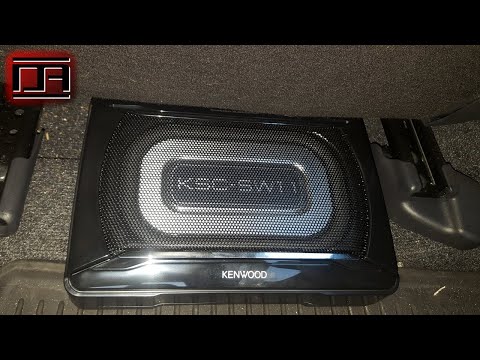
when I had my sleeper for a boat Corolla with the sound system and went to car shows but now I have the UK and I’ve really valued the trunk space, so I need it for work, so I don’t want to put anything back here that is going to be heavy gonna take up space or can be seen easily from people because it’s a hatchback and I don’t want to sacrifice the spare tire like I did on the last car now. There are some options where you can install a subwoofer right here. But those can either be very expensive or very heavy and still require an external amp and in order to have an amp that size properly for a subwoofer here it’s gonna be larger than what you can stash underneath the passenger side seat in the car and there’s also the extra wire and you’ll have to do so Now I wanted full sound for the most part I went with and under the seat subwoofer. Kenwood is a reputable brand and this is the only one that was small enough that will fit underneath up here. It will only fit underneath the passenger side because there’s the factory amp for the door Speakers on the pad on the driver side.
- subwoofer
- amp
- speakers
- trunk
- speaker
So I Have A Heavy Duty
velcro underneath of here to keep it in place so it will not move so the wiring is pretty easy go over briefly. And then I’ll show you more in detail on how to run it, But I slide this out of the way and we look down here. You can see the harness and this harness runs underneath up here and behind behind the head unit to connect the audio and then there’s also a remote down here. So if I turn on the car. It’ll light up and basically.
This Is The Phase Control Which I
left at zero the frequency for the crossover which I have pointing at the F on frequency and then the volume for the Wolford, which I just have set here the other thing that you need to do is run power So if I can get underneath up here. So the fuse box is on the 8th of here and I’m using fuse taps to power that I’ll link to a video where I’ve installed. that the ground I used the ground behind the kick panel and I found a spot in the fuse box that was only on when the radio was on and then I tapped into that one You’re gonna want to remove the head unit to run the wiring and I’ll show you how to do that in a moment but let me just show you basically how to run the wires so the easiest thing to do is grab this piece here lift it up and then grab the edge right here and then pull it this way and this entire piece will just pop right out and then okay. I’ve got too much stuff in here there’s gonna be a little piece of carpet down at the bottom of here. You’re gonna want to take that out and you’ll see two 10 millimeter bolts remove those bolts and then.
This Piece Will Lift Up And
it’ll separate from here along the edge here and underneath. In fact, you can see one of the clips here so I lift it up right here you can see where it’s going to separate. Once you get this piece out. Then you should be able to run the harness underneath of here and just reach your hand up and push it up here and then you might be able to stick your hand down here or through here with a pair of long nose pliers and kind of pull it up and then reach behind head unit to grab and bring the wiring up the remote you’re going to mount in place here. I used some velcro run the wire to the back and then feed that back through here.
I Think I End Up Feeding
the the wire for the remote into. The loom right here for the harness just so that it’s only one big wire coming out the side be sure to zip tie your wires when you can so they don’t interfere with any shift linkage and then you should be good alright. Let me go ahead and show you how to get the head unit out now okay so the first thing we want to do is take the trim off. I’ve already loosened it here but basically to get it off it’ll just grab from the bottom here and then here to pop it out in this top corner. This last corner here is a little bit tricky so usually I’ll grab it with my left hand down here and my right hand up here and pull kind of this direction here until it pops out but you can see the clips there unplug the clock real.
Quick Yeah, So You Can See Theres
the clips there and there so this this clip here though is the tricky one that gets it always get stuck up in there so you’ll if it gets stuck just kind of pull this direction and it’ll pop out. Eventually okay so with the trim off you just have to remove these four ten millimeter bolts you’ll need an extension for the top ones. You don’t need to use one as long as the one I have here. I’m gonna go ahead and remove all of these and then I’ll show you what it looks like behind alright. So this is the back of the head unit.
This Is The Harness That Goes
to the clock. So you can ignore that this harness right here just while we’re back here normally is not here. This is actually the input for the backup. Camera I have a third party camera that I installed, but harness is gonna look like this You can see it’s got ground power and then the video input from the camera so front speaker output rear speaker output and then this is actually where I’ve tapped in my subwoofer so let me go ahead and unplug all of these first because I’m balancing the head unit on my knee at the moment. So here is where the subwoofer is tapped into I had to open up the cover a little bit here just so I can expose the wires better and as you can see where I’ve just kind of back probed into the back of the harness.
So Each Wire Has Electrical Tape Around It
to secure it plus a zip tie and then overall. There’s a there’s a master zip tie around all the wires and that. Keeps this from moving if we look here the black wire on the factory. Harness has the white wire for the subwoofer going into it.
- subwoofer right expensive heavy require
- little small subwoofer uk
- subwoofer uk gonna ton space
- seat subwoofer kenwood reputable brand
- car options install subwoofer right
The Yellow Wire On The Factory Harness
has the white wire with the black stripe from the subwoofer going into it and we look on the other side here. The red wire from the factory harness as the gray wire going into it from the subwoofer and the white wire here has the gray wire with the black stripe going into it from the subwoofer so so that’s how it is I almost forgot. I actually just had to take the head unit back out again. So I forgot to mention the activation trigger wire that turns on the amp so on the other harness here the one that’s slightly wider that plugs in here now if you’re looking at it from the top here.
And Then Flip It Directly Upside Down
the second-to-last wire, which is white is where you want to connect the blue wire with the white stripe into from the amp and that’s what’s going to tell the amp to turn on When the head unit power is up alright. So I’m gonna use a simple tone generator on my tablet here to show you the frequency response because it’s hard to really show off a subwoofer on a UK video. But you’ll be able to hear the frequencies that it can play back is assuming that you have a subwoofer attached to your computer or your phone is playing through one that will reproduce these frequencies and I’ll give you my insight as it hits certain frequencies here so I’m gonna go ahead click on subtests. We’re gonna go from 150 down to 20 and I have the crossover set.
I Think Its Around 80.
I kind of just did it by my ear, trying to figure out where did it seem like it was gonna cut off at from the regular speakers on the car so let’s go ahead and then hit start. They’re really starting to feel that rearview mirror shaking a little still feeling this as it’s going down all they’re starting to really diminish and now it’s really getting the mist here at 28 and I can still feel like a wobble in the car, but it’s pretty miniscule alright so I hope that this demo gives you an idea and helps you out if you’re trying to figure out a little small subwoofer for you or UK that’s not gonna take up a ton of space or add extra weight to your car thanks for watching.
Summary
Kenwood is a reputable brand and this is the only one that was small enough that will fit underneath up here . It will only fit underneath the passenger side because there’s the factory amp for the door Speakers on the pad on the driver side . So the fuse box is on the 8th of here and I’m using fuse taps to power that I’ll link to a video where I’ve installed.& So if I turn on the car.& It’ll light up and basically. That’s basically the phase control which I left at zero the frequency for the crossover which I have pointing at the F on frequency and then the volume for the Wolford, which I just have set here. The other thing that you need to do is run power. That the other thing is to run. The video will show you more in detail on how to run it, But I slide this out of the way and we look down here. We look at the harness and this harness runs underneath up…. Click here to read more and watch the full video